HOMELAB PROJECT v1


GOAL
A homelab is an environment meant to simulate components of I.T. infrastructure, equipment, and configurations similar to a business or enterprise network.
The goal of my homelab is to understand the process of installing, configuring, and optimizing I.T. infrastructure at a relatively small scale so one can apply similar processes to a real-world business or enterprise network.
For this homelab project, I will be building a platform with the flexibility to begin simulating a business network with different components including:
Installing and configuring a router
Repurposing an existing wireless router
Installing and configuring a network switch
Setting up an existing VM server for network access
Installing and configuring a dedicated DNS server
For brevity, I will link resources that I found helpful that go much deeper in detail on individual topics.
Quick Note: You may have already noticed that the rack and components are the literal definition of “DIY”. I’m a firm believer in figuring out a way to use what you have to try accomplishing your goal. Obviously there is a bare minimum of hardware requirements, but a “homelab” is exactly that, a lab. It’s a space to experiment, break things, and put them back together in different ways. For now, the rack is handmade, old hardware is repurposed, and many items were purchased second hand. Equipment will come and go, but the principles and learning opportunities are what matter.
Setup:
ISP Modem
Router - Ubiquiti EdgeRouter 6P
Switch - Ubiquiti US-16-150W
VM Server - Intel Nuc 7th Gen
WAP - Netgear Nighthawk R7800
NAS - WD My Cloud 2TB NAS
DIY Network Rack 22”x12”x16”
Patch Panel
Desktop Machine - M1 Mac Mini
Mobile Machine - 2016 Macbook Pro 15”
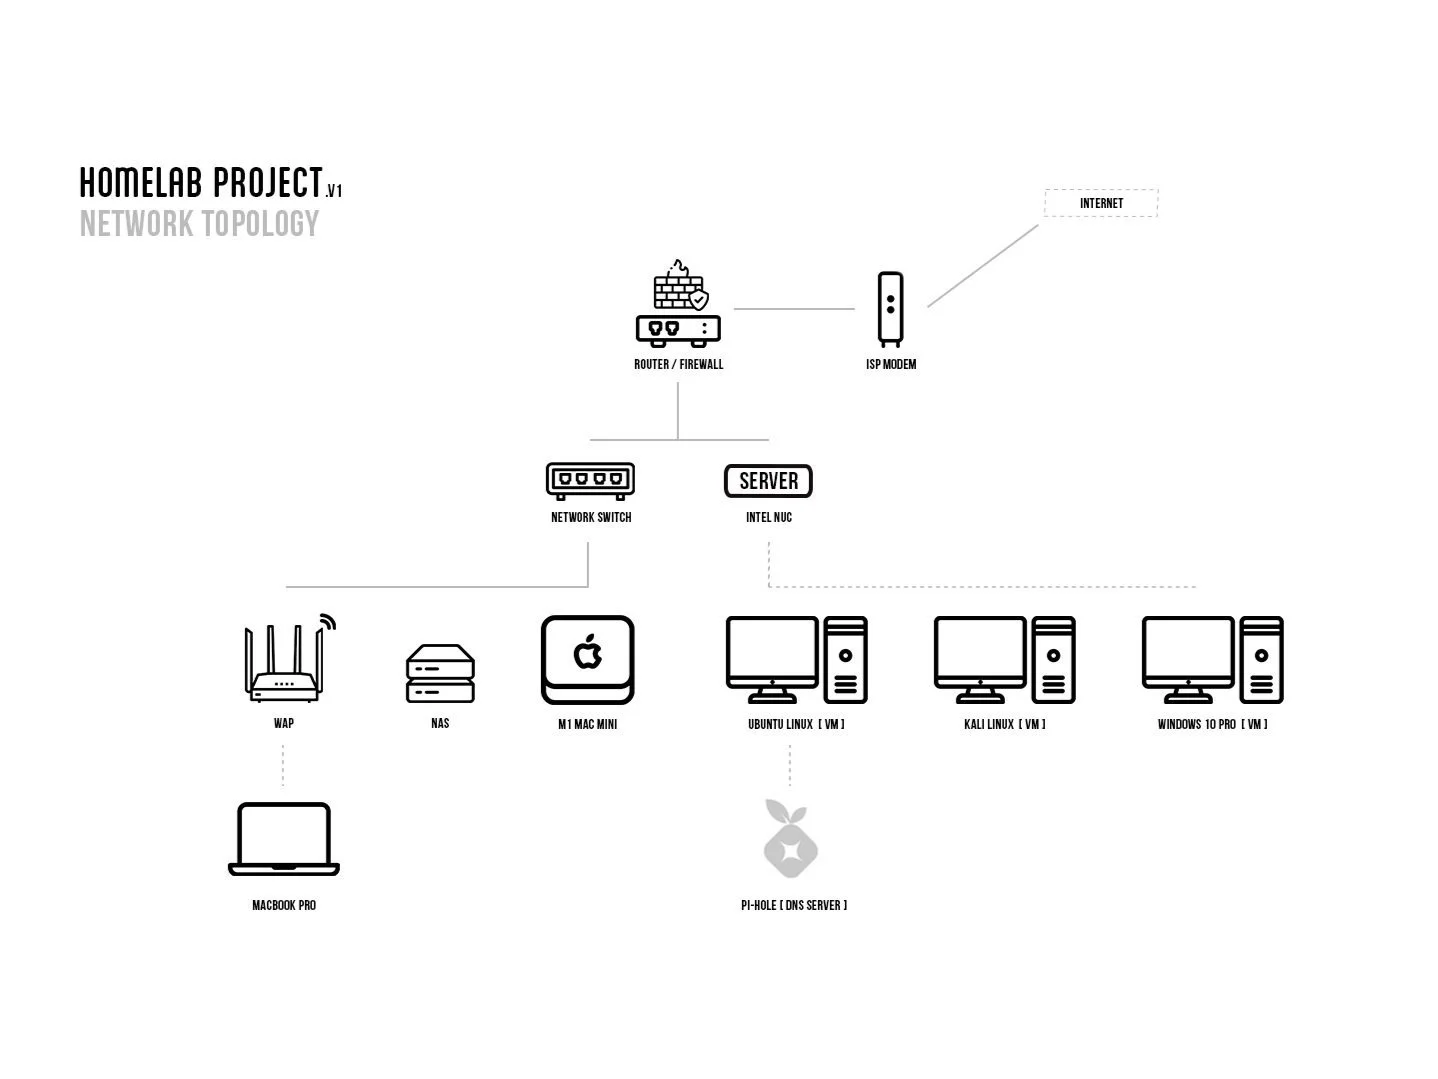
NETWORK TOPOLOGY
To begin the Homelab Project, I have first created a network topology of what I want my environment to look like after completion. Creating this little network topology has helped me get a general understanding of what I am trying to do with this particular setup.
The Network Rack
Like most things, this is something that you can spend a lot of money on, or practically nothing at all. In this case, I needed it to have a relatively small footprint because I wanted it easily accessible next to my desk. All of the components in it are small, low power, and basically silent.
The makeup is as follows:
22”x12”x16” frame (made from 1.5”x12’ lumber) sanded and assembled with pocket holes. The top is just a thin sheet of plywood cut to size.
ISP Modem
Ideally, you want to have your internet drop straight into your rack. However, mine is located in the master bedroom closet, which is on the opposite end of the house. The connection is gigabit fiber and would cost a decent amount to relocate the drop, even doing it myself (eventually I’ll get around to doing this). So for now, I logged into my modem using the standard 192.168.1.0 address, disabled all of the network services and set it in “bridge mode”. From here a Cat6 cable runs through the wall to the router in my rack. This does affect my connection speed, but in real-world use, it really doesn’t slow me down.

Provided by Google
Router
The Unifi EdgeRouter 6P is the point in the network where I decided to segment things. Here is where I configured two different sets of IP addresses for the switch and the server. The items connected to the network switch are used more for personal and work, where as the NUC will host my VMs and services. Alternatively, I could have kept them within the same IP address range and segmented the NUC via a switch VLAN, but segmenting at Layer 3 provided flexibility to assign different firewall settings for each. Below is a great video by Crosstalk Solutions that helped with initial setup and configuration.
https://www.youtube.com/watch?v=EMu8Pi73ses&list=PLVQO6wwpEu2hu0nvozGh73x-i0jjmOKxc&index=46&t=544s
Network Switch
You’re going to want a “managed” switch for a homelab environment. This will allow you to configure each port individually, monitor, and provide greater control of how data is moving through your network. For this I went with the UniFi Switch 16 PoE. Although I don’t currently use any of the PoE, these will come in handy when I upgrade the surveillance cameras around my property. Ubiquiti makes it pretty simple to connect and deploy their products using their Unifi Network Application. Below is their documentation that will get you up and running in no time.
https://www.ui.com/downloads/datasheets/unifi/UniFi_PoE_Switch.pdf
VM Server
I Previously assembled an Intel NUC to use specifically for virtualization. I decided to use Proxmox as the hypervisor and it has been running like a champ ever since. The details of this build and configuration can be found here.
WAP
The Netgear Nighthawk R7800 previously served as my wifi router, but since purchasing a dedicated router, I instead repurposed it to strictly serve as an AP. When logging into the admin portal via IP address, similar to my ISP modem, I was able to disable all of the services except for the 5GHz WiFi band. I manage it and everything connected to it via the UniFi switch that it’s connected to.
https://kb.netgear.com/20927/How-do-I-change-my-NETGEAR-router-to-AP-mode
DNS Server (optional)
By default, my ISP modem provided DNS services to my network, but I wanted more monitoring control and flexibility with blocking website trackers, ads, and unfavorable sites in general. Pi-hole is an extremely lightweight network level blocking application and when I found out that it can be hosted on a Linux VM, I had to check it out. I plan on doing a separate write up specifically on Pi-hole so for now, here’s where you can find it.
Primary Machine + Extras
Not pictured is my M1 Mac Mini that I use as my primary machine. It’s mounted under my standing desk so that it moves up and down with my monitors. The white keystone jacks on the left side of the rack are routed directly to the Mac Mini for quick access to USB 3.0 and type-C ports. The separate 4-port USB dongle is used for power delivery to charge other peripherals.
In Conclusion
Homelabs are universally considered to be rabbit holes, constantly evolving over time. As this build is very beginner friendly, some upgrades that I’m keeping an eye out for are a rack mountable Uninterruptible Power Supply (UPS), a larger NAS to set up RAID level backup redundancy, and of course a (larger) metal rack with room to grow.